I've just had my acceptance notice for this:
Anglian Potters at All Saints, Jesus Lane, Cambridge
This selling exhibition runs from Saturday, 17th November (mulled
wine and mince pies between 12 noon and 2 p.m.), and closes on Sunday,
16th December.
Opening times: Mondays to Saturdays 10 a.m. to 4 p.m.
Sundays 12.30 a.m. to 4 p.m.
There are usually 70-80 potters participating in this, so it's a great chance to see a broad sampling of what clay can do.
I'm heading out to the studio now to work on a commission. I wonder if any new ideas will happen while I'm out there.
Is there anything you especially want to see from me when you visit this show? At the Ickworth Wood Fair, one woman told me she had gone to the show last year to top up her game piece collection, but I wasn't participating that time.
Saturday, 20 October 2012
Thursday, 16 August 2012
Dragonfly
 This morning we drove the the Wayland Dragonfly Gallery in Watton, Norfolk to drop off some Face Plates for an upcoming show. Everyone was very nice and helpful in providing what I needed to make it all look good.
So now if you can't make it to the exhibition, you know what of mine you're missing, and if you see something here that you must have, you know where to buy it!
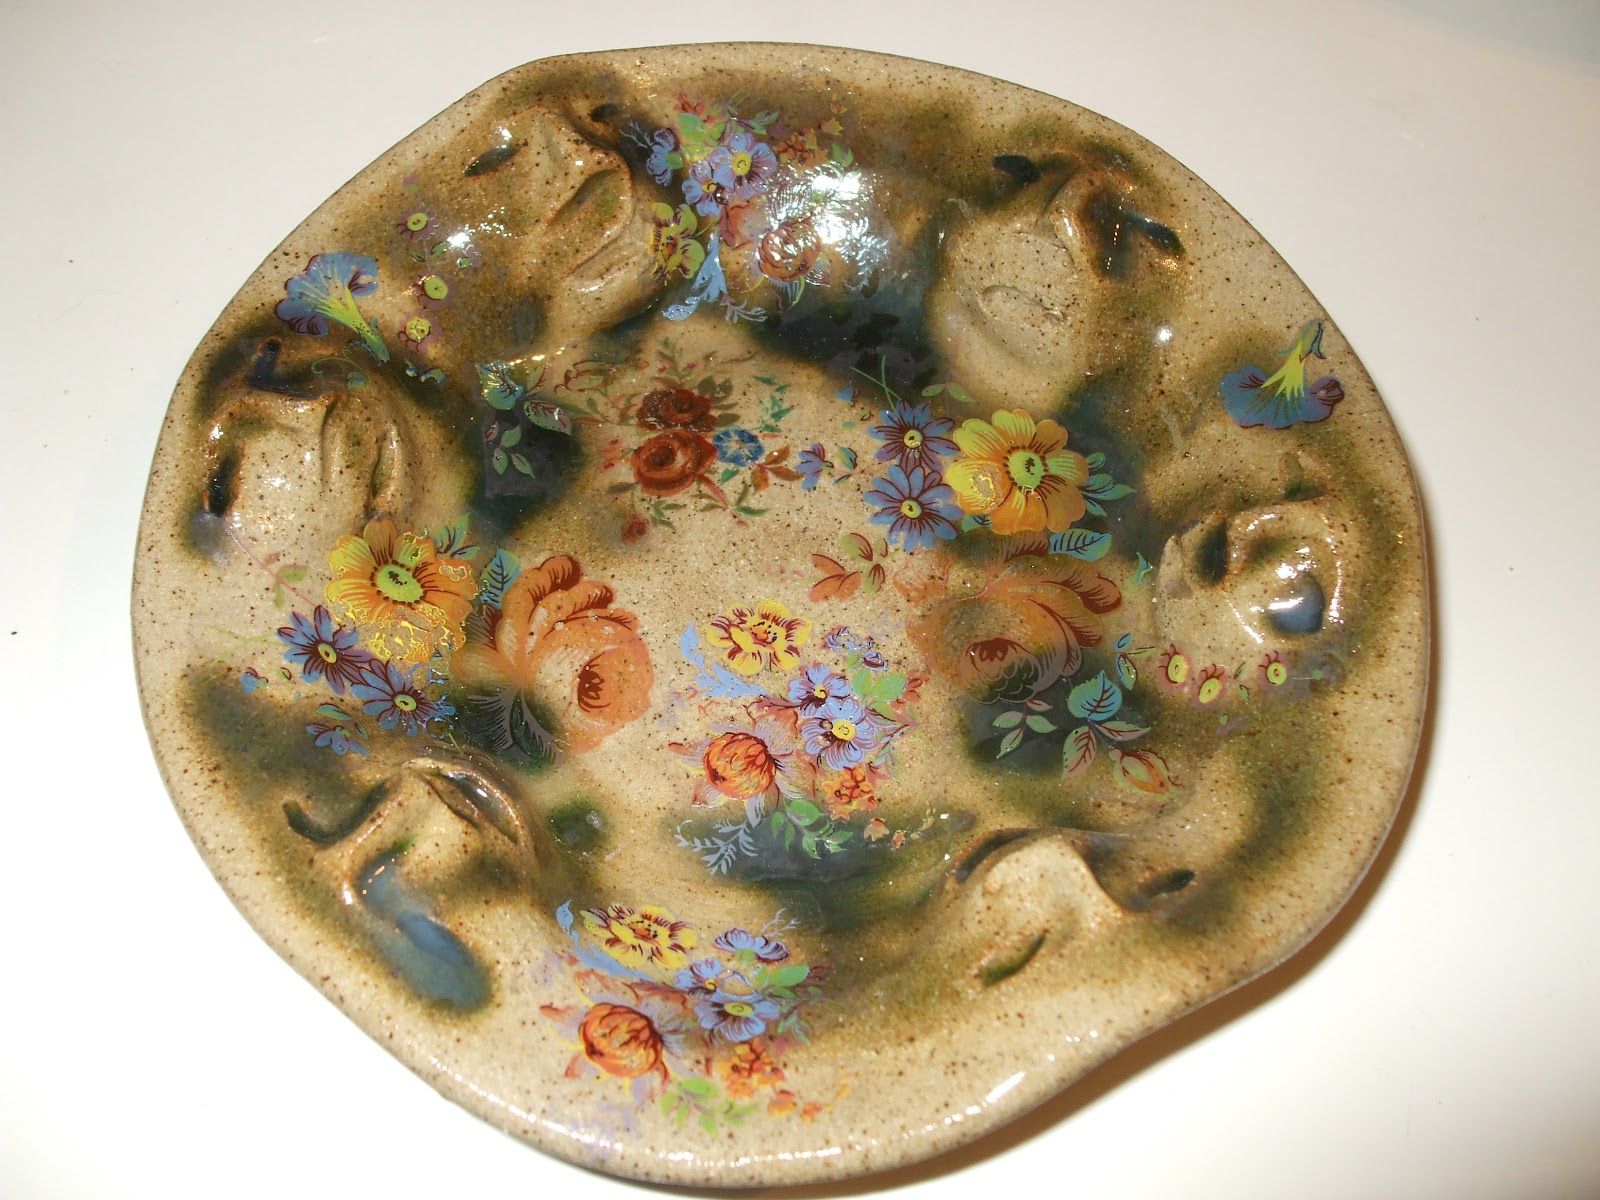
The plates on the lowest surface are in the vicinity of 11" round. The small one at the top is about 6.5" round.
It looked like some really interesting paintings were going up in other areas.
Tuesday, 14 August 2012
Wayland Dragonfly Summer Exhibition

I'll have some face plates in this exhibition. It should be really good. Stop by if you get the chance. Please RSVP to the email shown above if you're going to the preview, otherwise, just drop in during the two weeks. More information can be found here: https://www.facebook.com/pages/The-Wayland-Dragonfly-Gallery/198905453480213
Monday, 16 July 2012
For completeness of the Face Plate experience

This one is green with black on porcelain.


These were actually in the very first batch. Both V9G using glaze to accent the faces.
So you see, Face Plates are not just one thing.
Sunday, 15 July 2012
Open studio closed
The yellow flags of Cambridge Open Studios have come in for 2012. The doors are closed, and clean up has begun. If you couldn't make it, I'm sorry to have missed you, but let me see if I can re-create the experience for you in some small part.
A few questions and comments came up repeatedly. Let me share some of them with you.
(1) You're American? Where are you from?
I am originally from the US, and although I have been here for 13 years and now also hold British citizenship, I have failed to gain any sort of accent at all. I've lived a lot of places in Left-Pondia, mostly across the middle (IL, NJ, CA, IN, UT, and HI just for a while). Most recently I lived in San Francisco, and would like to claim it, but I don't know if 10 years is enough to make me from there. Thirteen years is not enough to make me from here.
(2) Did you hand paint these?
No, I bought vintage decals from a shut down pottery up north. I like the "found" quality of them. I also alter my mugs and such with "found" texture items, so I see this as consistent with my style. I think the work is still pretty distinctively mine. I might make my own decals in the future, but I'm waiting for a clear vision of what they should be.
(3) Do you do workshops/classes?
I never have because I never had the space. My studio is very small. We've got a new possible working space now, so it's not out of the question that there could be some hand building events in the future, but nothing is organized yet.
(4) You make jewellery? I didn't know you make jewellery!
Yes, I do. It started with making coloured porcelain beads, which I intended to sell to crafters, but I made a few samples to work out any problems, and never quite stopped. I'm now playing around a bit with copper and glass as well.
 |
 A little closer on a few of those.
 ... and some earrings. I ran out of the cards I display them on, so some are in little plastic pouches. More cards have been ordered.

More necklaces and some bracelets. Short on detail here, but you get the general idea.
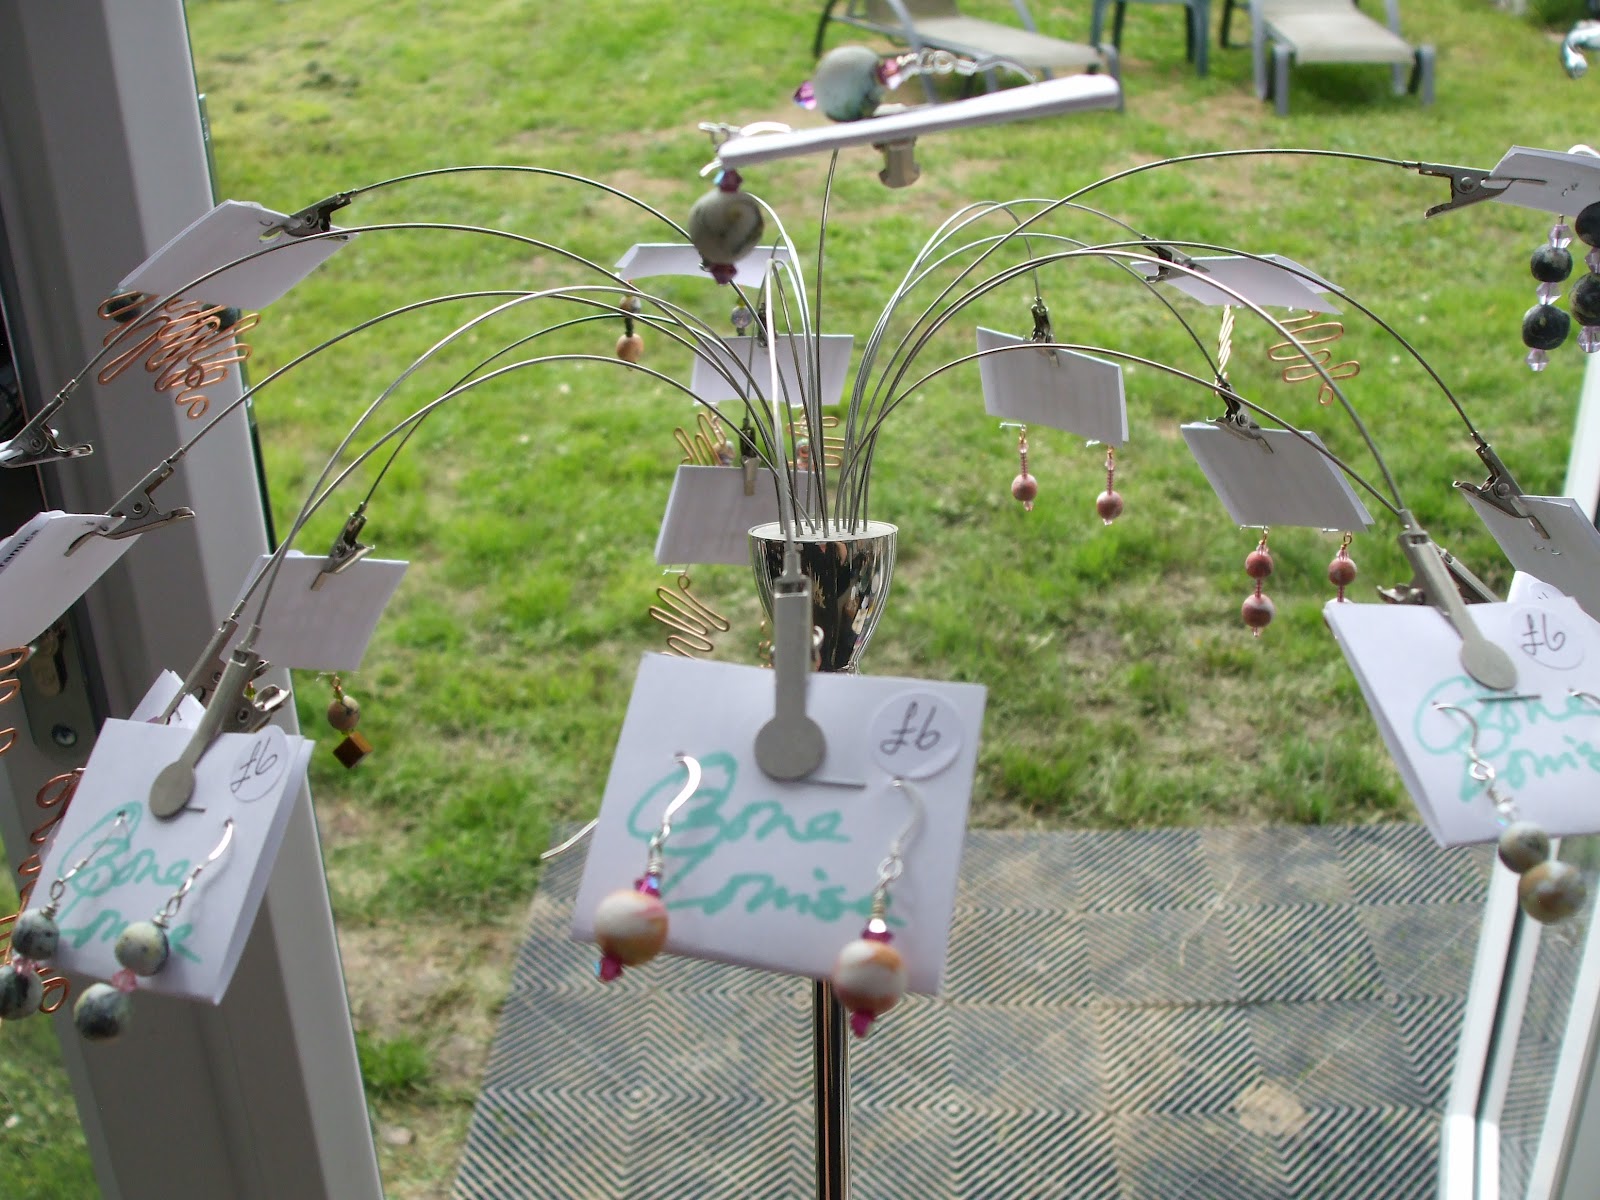
I found this funky wire tree with grabby clip things, and snapped it up to make an earring tree.

Thanks to everyone who came out to talk to me and see what I do. I really appreciate that you braved the weather, and came out to our little village just to see me.
There are still two weekends left of Cambridge Open Studios 2012. I'm going to go see other studios. I hope you go out and visit some too, if you are able.
Saturday, 7 July 2012
Cambridge Open Studios 2012


This is in our conservatory, which was a building site 4 days ago. It's a big improvement over the tent I've used in previous years. Torrential rains are a lot more tolerable in solid construction.
See that white door through the window on the left of the image? That's the door to the actual studio, which as you can see, is open. I did do some jewellery in the display room, so it was a working studio today too.
 Mugs! I just love to make mugs. There are too many on the display, but you can live with that, can't you?
  This is the new work for this year. Face plates, butter dishes, soap dishes, and small people (down at the far end).
I expected low attendance for the first day because there is so much going on in town. The Olympic torch came through, there was something on Parker's Piece, and it seems like every village school had some sort of fete. I wasn't disappointed with my low expectations, but had a really nice time talking to the people who did come.
I'd worked so hard to get this already despite the heavy rains this year not allowing work to dry and the builders having delays that it was almost nice to have the enforced inactivity. I'm all rested up now, though, so some Sunday visitors will see a perkier me.
I'm open again on Sunday from 11-6, and the same again next Saturday and Sunday (14-15 July). I'm number 97 in your guide book.
Tuesday, 3 July 2012
Getting ready

Monday, 2 July 2012
Face plates with decals
 Fresh out of the kiln!
 The decals I use are vintage, acquired from a shut down pottery in the north of England. They used to be the sort of thing that would grace commemorative mugs and dinnerware. No more. I showed some of my work to the people I got the decals from, and they said they didn't mind the sacrilege. Their time is over, and they are glad the decals can have another life.
I know it's hard to gauge size here. They range from about 4 inches to about 12 inches across.

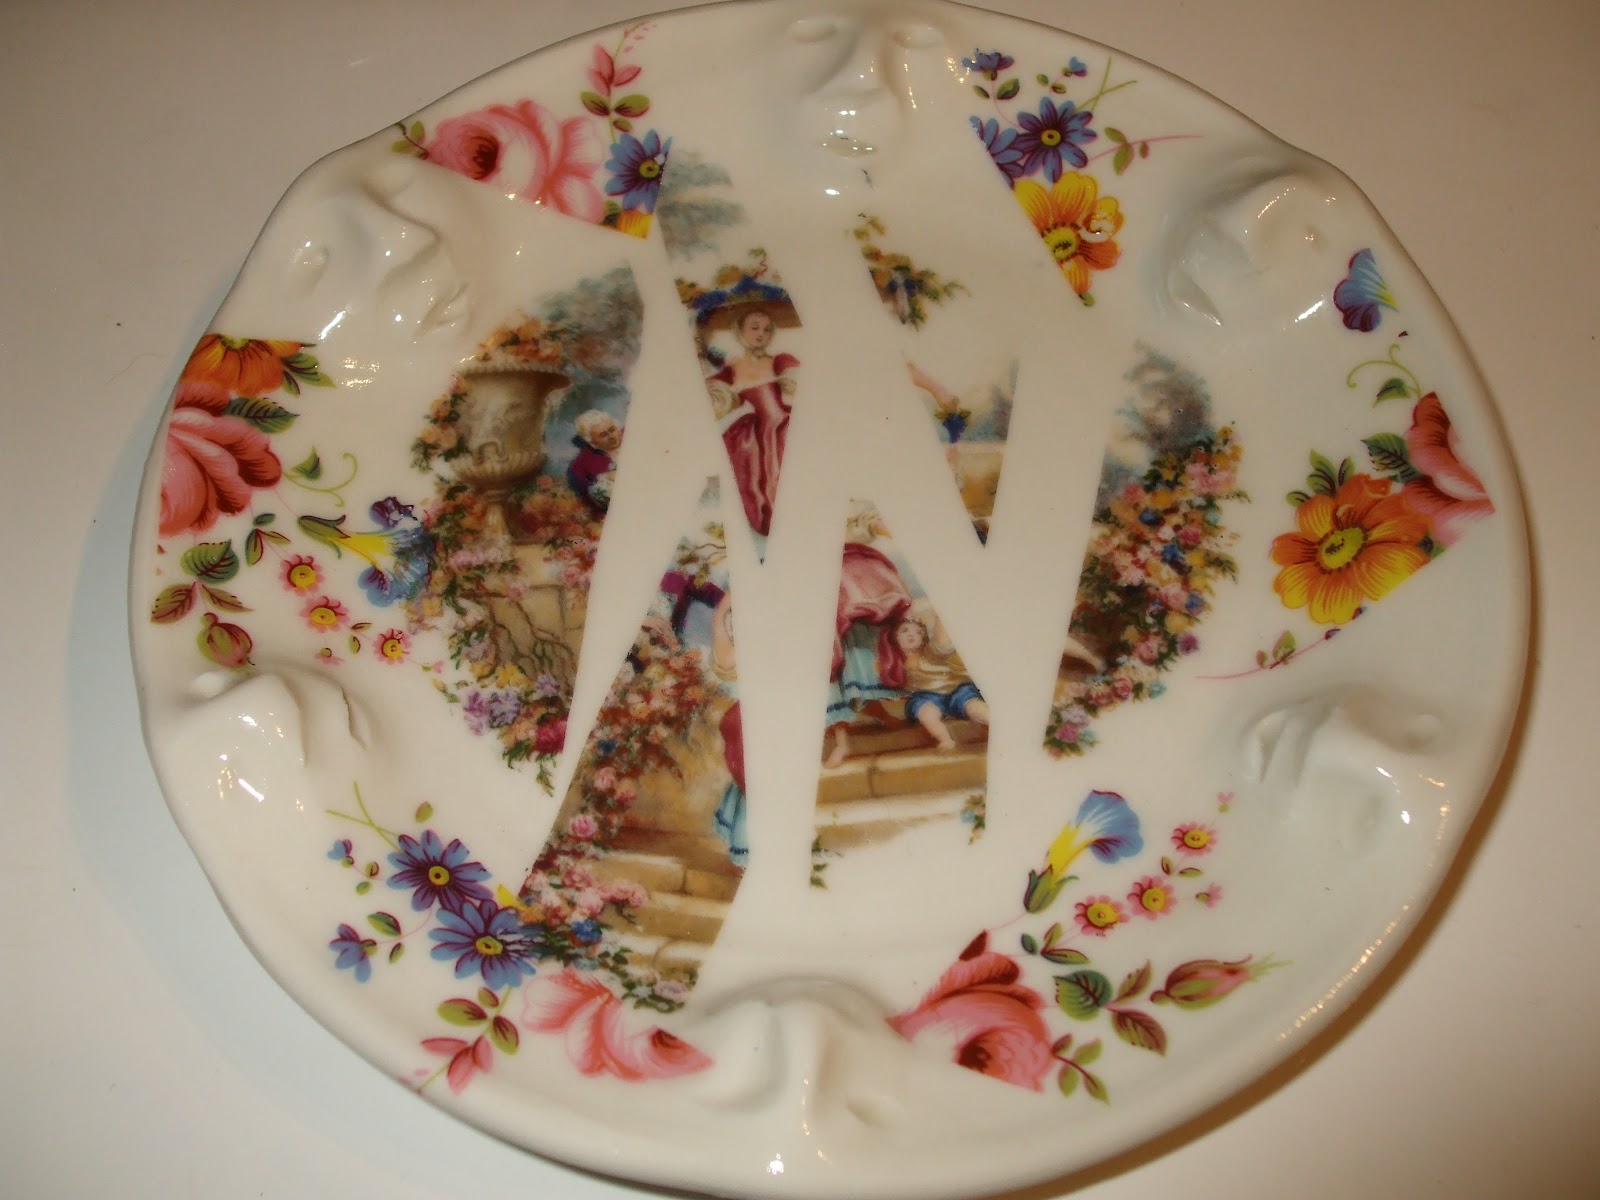
And again in a smaller version. It's very different on porcelain. I find myself looking at the white space more.


These Victorian lovers get to stay whole. Small.

V9G clay, a doily impressed when the slay was wet, dark glaze down in the grooves, clear glaze over it, and decals that coordinate with the browns. Medium.


Small and flowery.


Large.
Thursday, 28 June 2012
Cup of light

Sunday, 24 June 2012
Paper Clay Patches
I tend to think that once I know something about ceramics, it is a thing everyone knows and is obvious. My own knowledge and experience seem routine to me, so it's always a surprise when I make a comment about a process and the people I'm talking to don't know about it. This happened quite recently with mention of paper clay patches, so I'm going to explain it here. If you already know about it and this is all obvious, you can skip this.
Clay shrinks as it dries, and it shrinks during firing. Sometimes if you are joining two bits of clay and they are at different stages in the drying process, they will pull apart as drying continues. I started using paper clay slip for joining parts because of this. The paper in the clay tempers the different shrinkage and lets the bond take place successfully. So that's a good thing, but that's not what I want to talk about. Paper clay can also be used to fill cracks and mend breaks at the greenware or bisque stages.
I'm using mugs as an example here because I happen to be making mugs, and I had some sprung handles. It's been really hard to keep the moisture content right with the heavy rains we've been having. My studio is very rustic and influenced by the weather. The timing was off with a few of these handles, so this is what happened. I love to make mugs, and I want each mug to be special to the person who uses it, so I don't mind slaking down failed mugs and trying again, but for the purpose of illustration, I'm going to show you some repairs. If you have some work you've been labouring over for months on end and it gets a crack or break, you might want to try this technique to save it rather than melt it down.
 Here we see a sprung handle. The handle was a bit too dry when I put it on, and although it seemed to show enough flexibility at the time, that turned out to be just one of the sneaky tricks porcelain plays. It was too late, and when I returned the next day, the handle had cracked, and the mugs were well past leatherhard, approaching bone dry.
This clay is Valentine Clays Royale porcelain. I assume it should go without saying, but use the same paper clay as the original clay body for this sort of thing.


In the mean time, I noticed a small crack in a pot that had just come out of the previous bisque firing. This is an occasional side effect of the way I alter my pots. Again, I might have just thrown this out, but I was thinking of you and your need to know, so went ahead with the patch. It's made of a different clay, Valentine Clays V9G. I didn't have any V9G paper clay on hand, so I made some up.
 First I ripped up some old egg boxes. You can use any paper for this. Lots of people swear by toilet paper, and I've heard of people using computer paper or newspaper, or whatever is around, but I like egg boxes because I learned that they are an end of life recycled product. Paper can be recycled up to seven time (I have no idea how the tell how many times it has been recycled, tell me if you know), and when it's done, it gets made into egg boxes. Egg boxes cannot be further recycled, so they go into compost. Compost is a good thing, but I think it can spare me a few egg boxes. Here I have used the whole lid and half of the bottom of a 12-egg box. Don't worry about the colour, it burns out.
Add water and pulverize. It's fast. It doesn't have to soak for ages, just go ahead right away.

Next I glopped in a bunch of the squidgy V9G from the bucket of wet clay waiting to be reclaimed, then pulverized it together with the paper so it's nice and smooth and consistent throughout the batch.
Some people find a benefit in being precise in their measurements. I'm precise in glaze mixing, but I don't find it matters for this. I've heard of paper additions being anything from an iota to about 50%.

And it's good to go. Be sure to label both lid and container if you're using more than one type of clay in your studio.

Next, I work the paper clay into the crack. It could subside into the crack a little, so let it dry for a short time and then cover it with a little more. Neatness does count here because this is going to get glazed without another bisque firing. I have, in the past, reattached little broken off bits with this paper clay on bisque technique, and it's been fine. It might not always be fine, but if your piece has become un-fine without trying this, you have nothing to lose and possibly something to gain.

Back to porcelain. Bisque firing done, mug ready for further processing. I can still sort of see the line where the gap was.
 I do generally go over my mugs with a sanding pad before glazing, just to make sure no little stray sharp bits are lurking on the underside of the handle or on the rim where lips might object to them. I smooth off my signature on the bottom so it doesn't stab people who hold the mug from the bottom. Reconstructive surgery takes a little more work than usual, but not vastly more. If the piece is worth it, you won't even notice the extra minutes.
I use silicon carbide embedded griddle pads, made for cleaning flat grills in restaurants. Sandpaper would do just as well, and is probably easier to find. I also use a metal tool to ping the easy bumps off. The handle repair is just going to take a little extra rubbing with that pad. Bisqueware sands easily, paperclay bisque doubly so. It's sort of like firm chalk.

Once done, it looks much like any of my handles. The repair is not obvious unless you're really looking for it. Maybe not even then.

An overnight stay in the kiln with a trip to 1300 degrees C, a day to cool, and out they come.
Done.


Let me know what you think!
Subscribe to:
Posts (Atom)